October 1, 2024

Fusion Splicer Troubleshooting: Maximize Quality Splices and Efficiency
When fusion splicing in the field, a number of issues can arise, causing equipment errors and faulty splices, leading to high splice loss. To counteract these errors, technicians can go through the following troubleshooting checklists:
A. Measured High Splice Loss
-
- Perform an Arc Test: Before splicing, it’s important to perform an arc test to acclimate the machine to its current environment. This helps the splicer determine the desired arc power needed to perform in different temperatures and humidity levels. For videos on how to perform an arc test on Sumitomo Electric Fusion Splicers, check out our how-to video library.
- Verify Splicing and Heating Settings: If the splicer is set to Auto, change the programs to align with the fiber type you are using.
- Confirm the Cleave Angle is Accurate: Proper cleave angles ensure better fiber splicing, leading to lower loss levels. Examine your cleaver to make sure it is free of fiber offcuts on the fiber pads or clogging the mechanism. Ensure the blade is sharp and the mechanism is in auto-rotate.
- Replace Electrodes: For SEI fusion splicers, the average electrode lifespan is 6000 arc discharges for a single fiber fusion splicer and 1500 arc discharges for a ribbon fiber splicer. A low strength arc output may indicate the need to replace the splicer’s electrodes.
- Clean the Machine: A splicer is a complex machine that reaches optimal performance from routine cleaning and maintenance. Examine the splicer and its parts – including V-Grooves, fiber clamps, and lenses – and use quick evaporating alcohol and lint free cotton wipes to clean any dirt and debris.
B. High Fiber Offsets in the Q102-M12+
-
- Prepare the Fiber: First, examine the prepared fiber. Has it been cleaned thoroughly? Has any of the ribbon matrix remained after the thermal stripping process?
- Fix Fiber Alignment in Holders: Once in the fiber holder, is the fiber spread out too far or overlapping? Make sure there are 12 fiber end faces, evenly spaced to fit on the V-Groove in the machine.
- Utilize Enhanced-Auto Clamping Adjustment System (ACAS): In the splicer setting menu, turn E-ACAS on if it is not already. In an attempt to remove debris, this setting will automatically move and adjust fiber in and out and add or remove pressure on the fiber clamps. This improves fiber alignment on the high-precision V-Groove, reducing offset and splicing errors.
- Clean the V-grooves: Use a V-Groove brush without metal or a cotton swab to brush away any fiber offsets. For our recommended cleaning procedures, check out our how-to video series here.
- Manually Adjust the Fiber Clamp: Another way to ensure the fibers are placed evenly in the V-Groove is to utilize the clamp lever - the flat, wide tapper arms in the hood of the splicer. Maneuver the arms gently to knock the fiber end faces into the V-Groove.
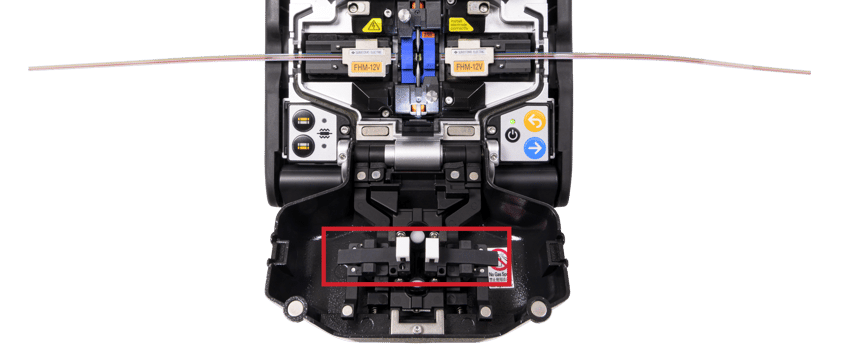 Fiber Clamp Adjustment Arms Highlighted on the Q102-M12+
If there are still issues with the machine, it may be time to send it in to one of our service centers for its recommended annual cleaning and calibration. With two centers located on the East and West Coasts, Sumitomo Electric Lightwave is better able to support customers with fast turnaround times and quality work.
To learn more, click here.